
Friday Bundle Batch With Fort Worth Fabric Studio
I am so honored to be today’s guest blogger for the Fort Worth Fabric Studio’s Friday Bundle Batch! Jodie has an incredibly talented roster of quilters who create projects for her specially curated fat quarter bundles every week, and I always enjoy seeing the beautiful projects they come up with. So when she asked me if I’d be interested in creating a project, I was flattered—and jumped at the chance!
This week’s bundle is called Window Box and features black and white low volume/tonal blenders and the vibrant florals from Andover’s American in Paris collection.
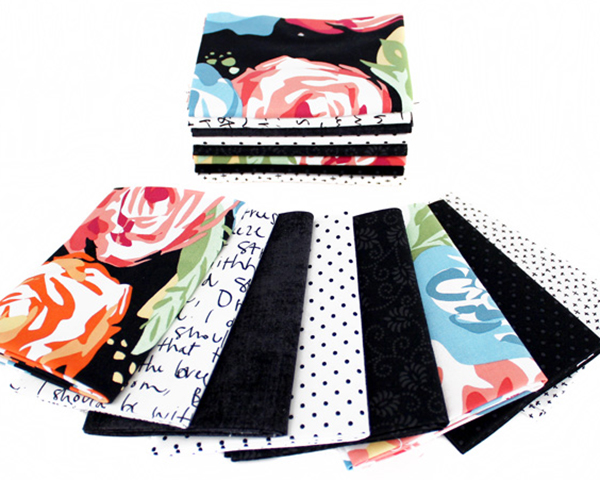
The Window Box bundle includes one fat quarter cut of each of the following:
- An American in Paris, Floral on Black (Andover)
- Dyrad Text, White (Fabri-Quilt)
- Cotton Shades, Phantom (Riley Blake)
- Swiss Dots, Black (Riley Blake)
- Essentials, Midnight Dancing Buds (Wilmington)
- An American in Paris, Floral on White (Andover)
- Swiss Dots, Tonal Black on Black (Riley Blake)
- Imagine, Plus’s White (Windham)

I just love those florals from Andover and the way that pattern pops against the black and white blenders, so I knew I wanted to make something that played up that contrast. I’ve also had Julie Hirt’s Hexie Tiles pattern on my “must make” list, but I’ve been waiting until I could find just the right fabrics for it.
As soon as I opened up my bundle of fabrics from FWFS, I knew they would be perfect sewn up into hexie tiles! So I decided to make a couple of pillow covers for my project.

I think they turned out pretty great! And my husband says that these pillows are his favorite things that I’ve made so far in my sewing journey, so I think that’s a win. 🙂 Here’s a quick overview of how I made my pillows, in case you’d like to make your own!
Supplies (Makes Two Pillows)
- Window Box bundle* from Fort Worth Fabric Studio
- Hexie Tiles paper piecing pattern
- Batting and muslin (2 pieces of each, about 18” x 18” each)
- Additional fabric for pillow backing* (2 pieces, about 18” x 18” each)
- Additional fabric for binding*
- Zippers (2, 18” long), if you want to make zip closures for your pillow covers
*A note about fabrics:
I was committed to using only the fabrics available in the Window box bundle to complete my project…until I realized that if I used additional fabric for the backing and binding, I could make TWO pillows, and my pillow greed won out. 🙂
I used additional cuts of the floral prints for my pillow backings and a green striped fabric from my stash to make my binding. Fort Worth Fabric Studio has several prints in stock that would work very well for binding and/or backing your pillows, so consider using any of these for your project:
- Wonderland, Gold Metallic Stripes (Riley Blake)
- Wistful Winds, Blue Stripes (Riley Blake)
- Whisper, Dashes in Pink Blush (Windham)
- Best Day Ever, Geometric Trellis in Leaf (Moda)
- KimberBell Basic, Diagonal Plaid in Orange (Maywood Studio)
Making the Hexie Tiles
The Hexie Tiles pattern includes several different sizes; I used the 2” finished size pattern for this project.
The pattern calls for three fabrics (outer edge A1/B1, inner edge A2/B2, and center C1/C2). I kept my hexies monochromatic, using the white blenders only with the white floral and black blenders only with the black florals. For example, I’d use Dryad Text in White for A1 and B1; Imagine Plus’s in White for A2 and B2; and the American in Paris Floral in White for C1 and C2.
To save myself some time, I cut all the fabric from the bundle into 2” x 5” rectangles. That gave me enough floral pieces to make a total of 18 complete hexie tiles with white floral centers and 18 complete hexie tiles with black floral centers. These floral-centered hexies comprise the main part of my pillow fronts.
I had enough of the blenders left over to make 6 complete hexie tiles with white centers and black edges and 6 complete hexie tiles with black centers and white edges. I used these hexies on the left and right edges of my pillow fronts.


The Hexie Tiles pattern has instructions for stitching the finished sections together. Here’s the great news: No Y-seams are required! Be sure to read Julie’s instructions before sewing your tile pieces together. You’ll sew them in vertical strips, rather than sewing each tile half together first.
Before quilting, I trimmed my pillow fronts to roughly 16” x 16”.


Quilting and Finishing the Pillows
I decided to hand quilt my pillows, which is a first for me! Hand quilting never really appealed to me before, but I just felt like it was the way to go for this particular project. Since I’ve never quilted by hand, I wasn’t sure what kind of thread to use—so I went with something a little more familiar: embroidery thread. (Specifically, I used DMC Pearl Cotton, size 5.)
I love doing embroidery and I was excited to see how hand quilting my pillows felt more like embroidery than outright SEWING something by hand.

Quilting by hand added just the right amount of texture to my pillows!

The white pillow front needed a little more definition, I thought, so I used a little more quilting for that one.

But the contrast of the floral against the black blender for the other pillow was so striking that I didn’t want the quilting to take away from that, so I used a little less quilting on it.

After quilting, I trimmed off the excess batting and squared up my pillow fronts a little more. I made a lapped zipper back for my pillows (using this tutorial), stitched by pillow fronts and backs together, and bound the edges with my green stripe fabric.
My pillow covers finished at about 15½” square, which works just fine for 16” pillow forms. (I read somewhere that you should always use slightly larger forms to give your cushions that perfectly stuffed look!)


I hope you’re inspired to make something with this week’s Friday Bundle Batch! Be sure to visit Fort Worth Fabric Studio to get your bundle before they’re gone!
Thanks so much for stopping by my blog today!

3 Comments
Leave a Reply
You must be logged in to post a comment.


Melanie C
June 23, 2017 at 9:13 amSo beautiful Anna!!!!
Carol
June 23, 2017 at 9:26 amLove the way these pillows turned out! Colors and patterns are perfect. And so enjoyed your blog about the process!
Kathleen
June 28, 2017 at 5:56 pmVery nice. Your hand quilting really adds to the design of the block.