The Weekender vs. The Ultimate Travel Bag
Hey everyone! Thanks so much for all the love for my Weekender Bag! I appreciate all your comments on Instagram.
I’ve had lots of questions about my thoughts on the Weekender Bag versus the Ultimate Travel Bag (UTB), and I really do have a lot of thoughts about the subject! I’ll give you the final verdict first, and then I’ll explain.
If you’ve never made a bag before and are an intermediate/experienced sewist, start with the UTB and purchase the class on Bluprint. I would not make the Weekender before I made the UTB. If you’ve made bags before, especially the UTB, then you’ll be able to make the Weekender without problems, so don’t let the reputation put you off. (And if you are a beginning sewist and have never made bags of any kind, I’d suggest starting with a variety of zipper pouches before tackling either of these bags.)
Comparison of the two bags at a glance:
| Ultimate Travel Bag | The Weekender |
| Boxier shape that works for women, men, and kids; looks more like a carry-on bag | More tailored, feminine shape; looks like an oversized vintage handbag |
| Pattern features lots of exterior and interior pockets | Exterior pockets only; you could add pockets to the lining, but you’ll have to find a tutorial—the pattern doesn’t give any instructions for that |
| Pattern calls for Soft & Stable as the only recommended stabilizer | Pattern calls for various Pellon stabilizers. You can use Soft & Stable (I did) but it might change your construction process a little. |
| There’s a Bluprint class with Annie Unrein that walks you through construction step-by-step | There’s not a video of the construction process, but there are loads of blog post with helpful tips |
| The bag lining is attached and “built-in” during the quilting process | The bag lining is a drop-in lining that is hand-stitched in place at the end of construction |
| Construction of the main zipper keeps much of the zipper tape visible, so color matching is very important as the zipper could really stand out | Construction of the main zipper results in a semi-hidden zipper, which has a slightly neater finish |
| There are no shaped pattern pieces to cut; you’ll quilt your fabrics with the Soft & Stable, cut out rectangles and strips from the quilted material, and shape the bag later | There are shaped pattern pieces to cut; even if you quilt your outer fabric and stabilizer, there are a lot of shaped pieces to cut out |
Here are a few pictures of my Weekender bag and the most recent UTB that I’ve made, so you can see how they compare side by side.

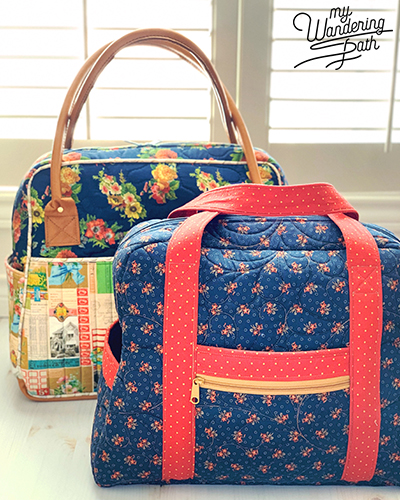
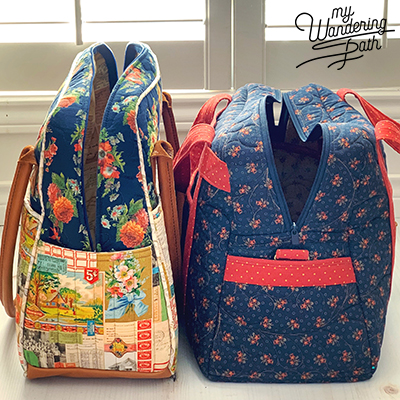
You can see that the Weekender is taller, but the UTB is wider, and I believe that the UTB has more storage capacity. I took one on a family trip to Ireland and I was amazed at how much I was able to comfortably pack into that bag. I could actually use the UTB for an overnight trip; it is the perfect size for a sleepover bag for kids/teens. I can’t imagine getting as much in the Weekender; it’s just a smidge too big to be an everyday bag, but not big enough (in my opinion) for an overnighter. It’s a good carry-on size though.
From a construction standpoint, when you get down to it, both bags have very similar construction. You end up with three pieces: the front panel and back panel (with their pockets and the bag handles) and the side strip (with the main zipper and the bottom panel of the bag). You’ll sew the panels to the side strip one at a time, and that’s how the bag is constructed.
The difference comes down to the additional elements on each panel (there are more interior/exterior pockets on the panels in the UTB) and how the seams are finished off (with interior binding for the UTB versus simply hidden under the drop-in lining for the Weekender).
I would love to find a way to merge the two patterns, because I love the overall shape of the Weekender, but I prefer the quilted lining of the UTB. In fact, I prefer pretty much everything else about the UTB. I’m not a fan of the drop-in lining for the Weekender. It’s just not tidy, in my opinion, and it’s a real pain to hand stitch that in. (Now, to be fair, I always hand stitch the interior binding in my UTBs, but it’s easier than stitching the drop-in lining for some reason.)
I also think it’s a serious flaw in the bag design to not have ANY interior pockets in the Weekender. No pockets at all? That’s a problem. I know I could have easily added some, but for one thing, I was in a hurry with this one and didn’t want to take the time (shame on me), and on top of that, I think the drop-in lining is too flimsy and wouldn’t support much of a pocket. The pattern doesn’t call for any interfacing for the lining, so I’d definitely put a light stabilizer on it if I decided to add pockets.
In terms of the struggle of getting all that thickness through my machine: the challenge is the same for both. With the Weekender, you have the added pressure of making sure the piping is set properly. We have industrial sewing machines for sewing my husband’s packs, so that’s what I used to sew my panels to the side strip because of the leather—I would not want to try that with my domestic Juki. She’s a workhorse but even she has limits. But if I hadn’t used leather, I think it might have been easier to get the Weekender through my machine than the UTB.
Annie’s zipper construction methods are genius, and I really like how the edge of the zipper tape is always stitched down in her bags—it’s tidy. I’ve read some complaints about the zipper construction in the Weekender, but I found it to be very simple and I really like the way the zipper ends up sort of hidden—the result is very polished.
And in terms of the pattern instructions, I think the written instructions for the UTB are just a tiny bit better than the Weekender, plus you have the added benefit of Annie’s Bluprint class. I can’t begin to tell you how incredibly helpful that class is! I learned so much in that class and it’s helped me with every byAnnie pattern I’ve made since. (This isn’t a paid endorsement by the way—I just really think this class is worth the price. I watch it every time I make one of these bags.)
So there you have it: The Weekender beats the UTB on style, but the UTB is hands-down the better bag in terms of functionality, and with the benefit of an excellent online class on constructing the UTB, I think it’s the better bag to start with if you are trying to decide which bag to make first. Whichever bag you make, just be prepared to muscle the bag through your machine during the final construction process. You don’t need to dread it, but expect it to be a slow, painstaking, and frustrating process. You’ll break at least one needle. BUT…you can do it! I have found that if I lower my expectations for the construction process, in the end, it’s never as bad as I thought it would be. *wink*
(If you’d like to check out the Bluprint class, you can find it HERE. Again, I’m recommending it only because I really enjoyed it and learned some great tips along the way.)
I hope this little recap is helpful! Have you made a Weekender or Ultimate Travel Bag? What did you think about it?
Thanks so much for stopping by my blog today!