Jardin de Fleurs Quilt-Along: WEEK 1
Hello friends! Happy June and—FINALLY—welcome to week 1 of the French General/Swoon 16 quilt-along! I know this QAL is kicking off much later than we’d anticipated and planned, and I thank you all for your grace and patience while we waited for our fabrics to arrive.
Sooo…who’s excited?? I know I am! I always love French General’s classic designs and color palettes, and Jardin de Fleurs doesn’t disappoint on either count. The colors are timeless and sophisticated, and the prints include sweet florals, a toile focal print, and versatile blenders.
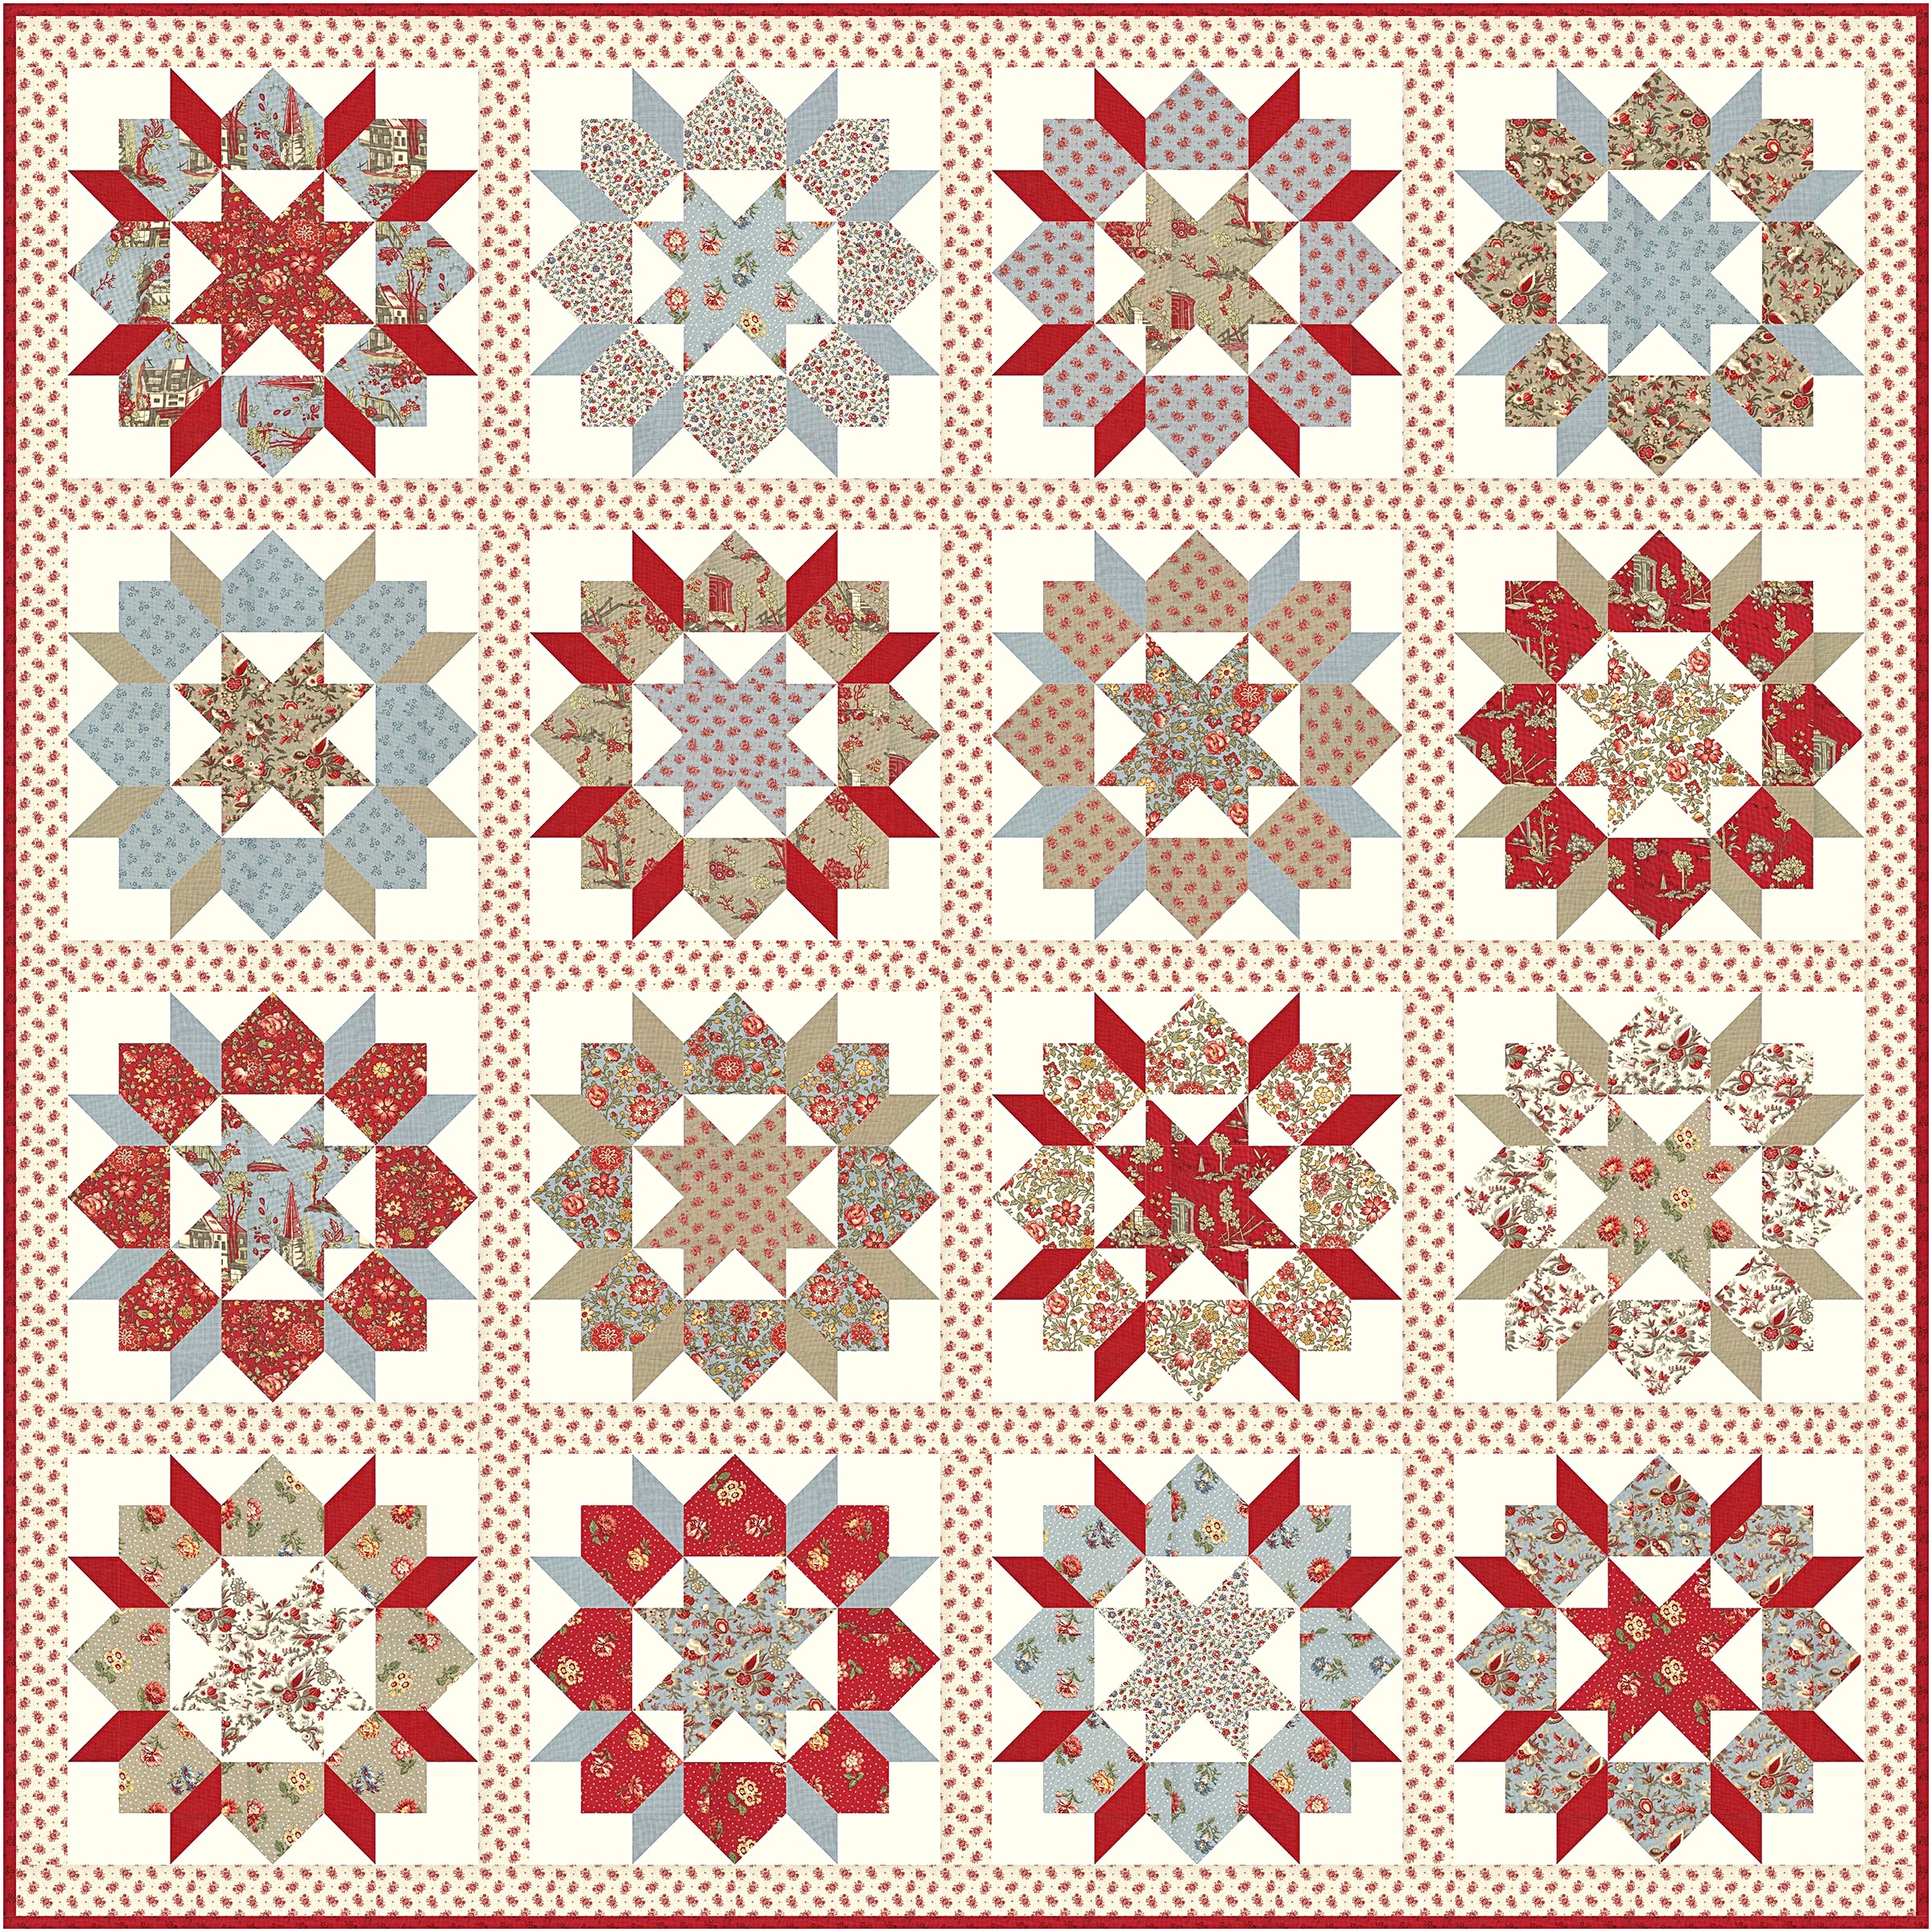
And for our quilt pattern, it doesn’t get more classic than Camille Roskelley’s Swoon 16! It’s practically a quilter’s bucket list pattern, and I can’t believe this will be my first time making one. I was waiting for the perfect fabric collection to use, and I finally found it.
Hopefully, all of you who have pre-ordered a kit have your lovely Jardin de Fleurs fabrics in your hands and ready to go! If you don’t have fabric yet, either because your kit hasn’t arrived or maybe you are going to just individually order the fabrics yourself, don’t worry—this week is all about prepping and cutting our fabrics, so you’ll have time to get everything before we start sewing next week! (Still need to order fabric? You can find the fabric requirements here.)
Our Fabrics
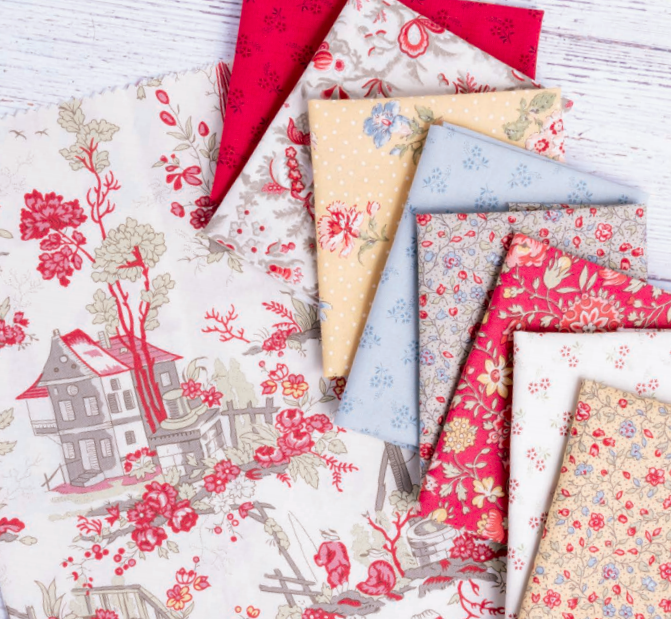
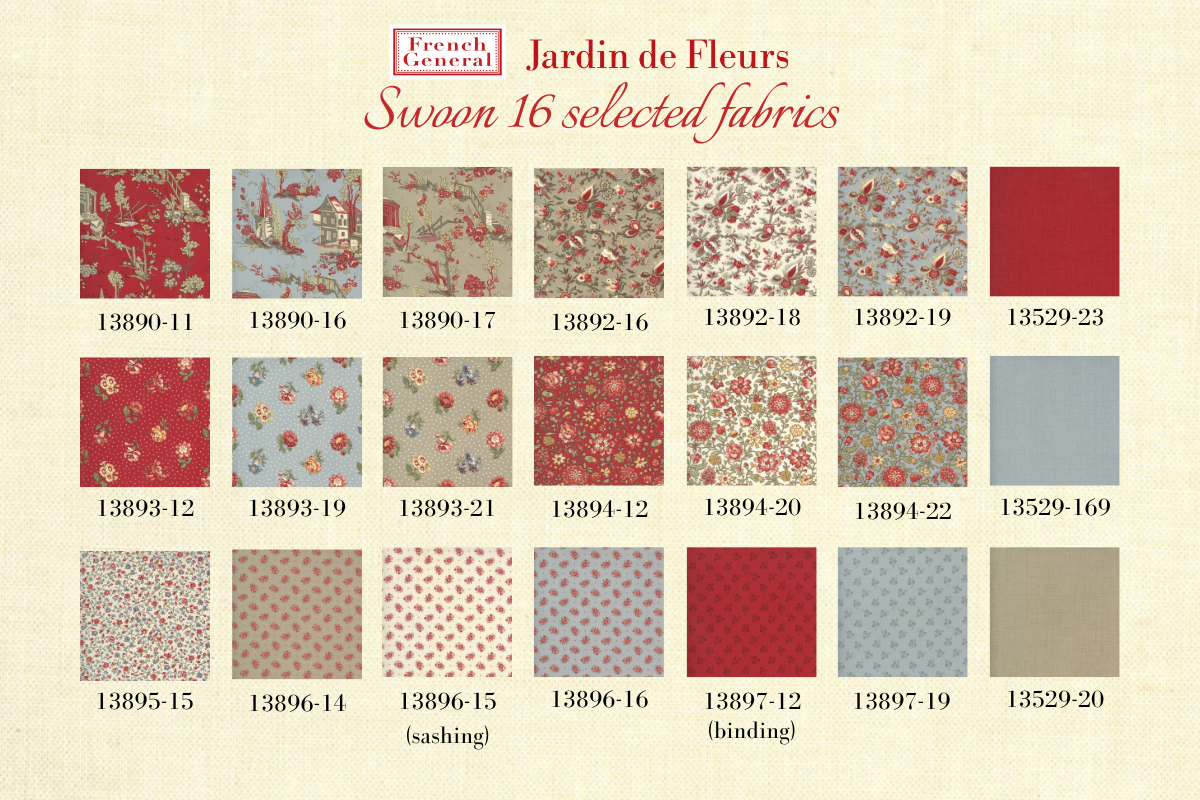
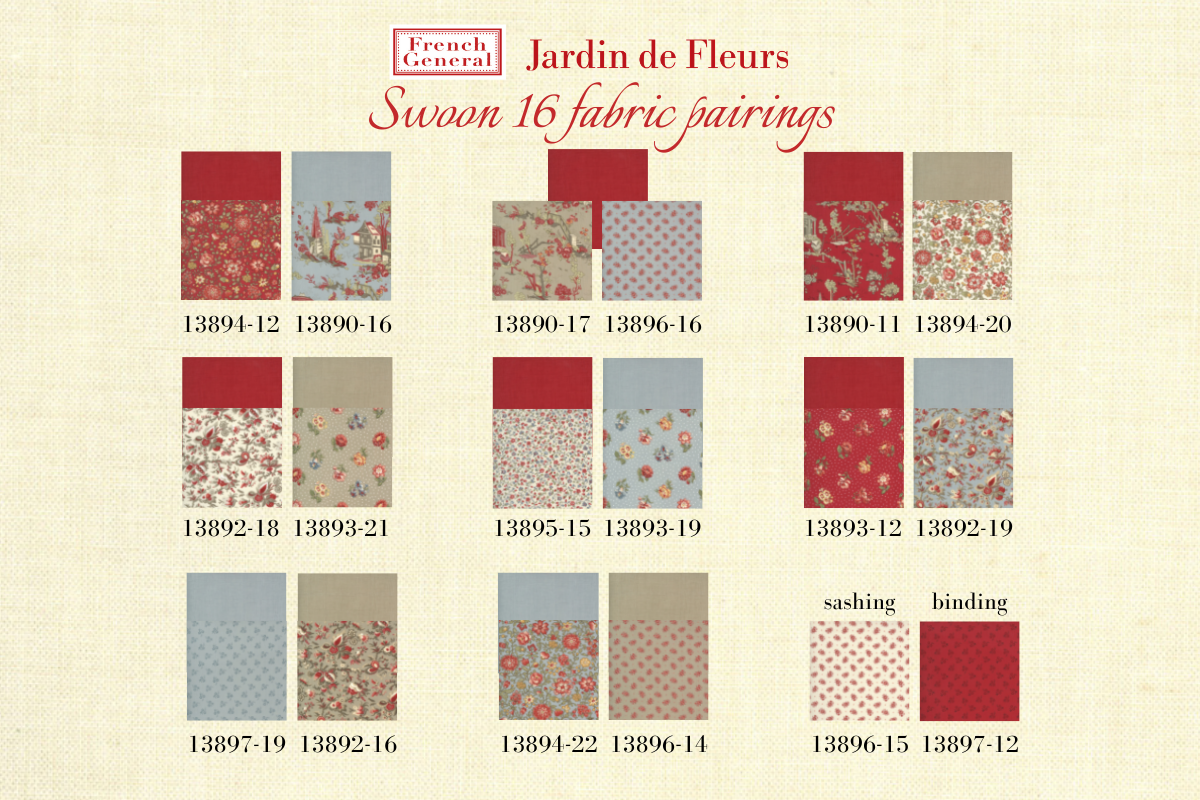
Let’s start by taking a look at the fabrics we’ll be using for our Jardin de Fleurs Swoon 16 quilts! Here are the prints we chose from Jardin de Fleurs:
I absolutely love the beautiful, buttery yellow prints in Jardin de Fleur, but for this particular quilt, we decided to stick with the classic French General red, soft blue, and taupe colors. (But believe me—I’ve tucked those yellow prints into my stash for future projects!)
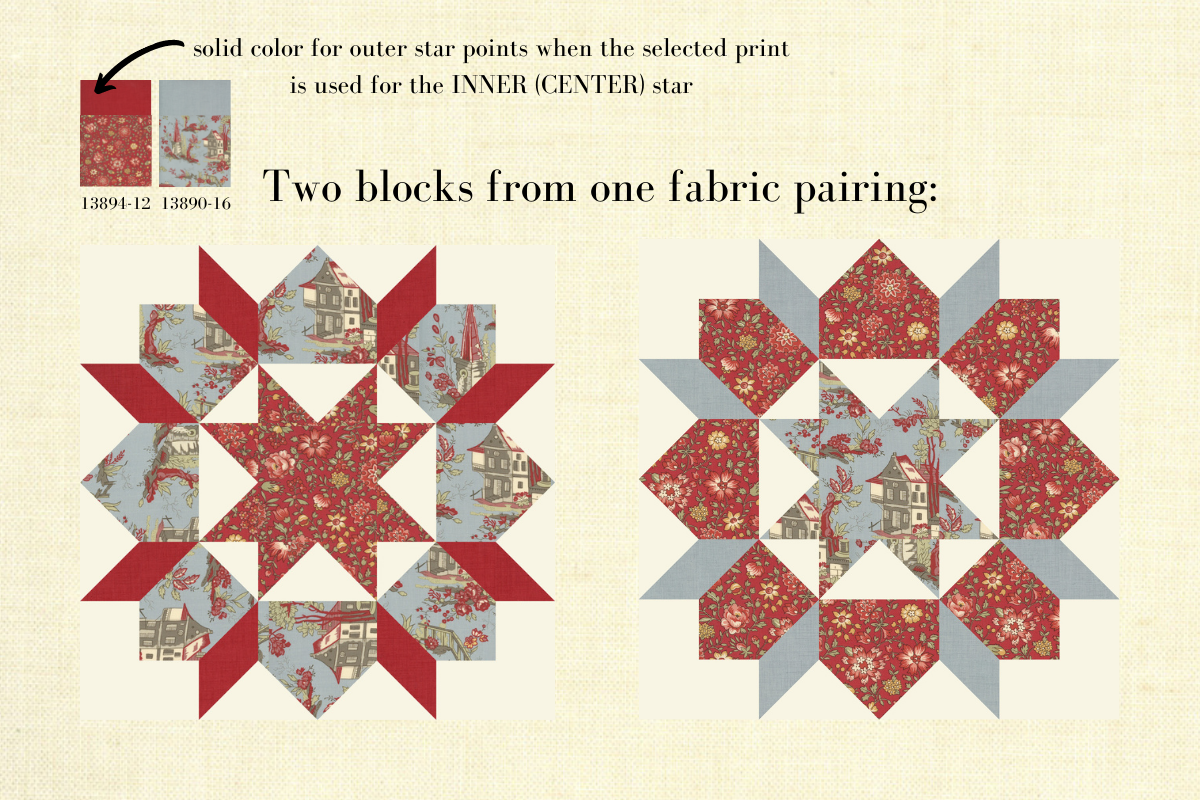
The pattern calls for three prints per block: one for the inner (center) star, one for the outer star, and one for the outer star points. I liked the effect of using solids in the outer star points instead of a third print, so you will see that reflected in the fabric requirements. We’ll still be using 16 print fat quarters, but you’ll need some yardage in red, blue, and taupe for the outer star points. (You can review the fabric requirements here.)
Fabric Pairings
The Swoon 16 pattern instructions call for cutting all the various pieces first, grouping them by type, and then mixing-and-matching the pieces for each block. I opted to pair up my prints first, so that each pair of fat quarters makes two blocks with the prints in alternate positions. (For example, Fabric A and Fabric B are paired to make two blocks: In Block 1, Fabric A is used for the inner star and Fabric B is used for the outer star; and in Block 2, Fabric B is used for the inner star and Fabric A is used for the outer star. The outer star points in every block will always be a solid.)
TIP: Before I start prepping and cutting fabrics for a new quilt, if I know I’m going to be pairing fabrics for the quilt blocks, I’ll usually take the time to pair them up on my cutting table and snap a picture of the paired fabrics with my phone. That way, if my fabrics get mixed up in the prepping and cutting process, I can just refer to that picture to make sure I’ve got my fabrics matched up correctly!
Here’s a breakdown of the fabric pairings I chose. Feel free to mix and match your fabrics however you like! (In the picture below, I’ve indicated the solid color I’m using for the outer star points when the print it’s paired with is used for the INNER [CENTER] star.)
My Favorite Fabric Prep Tip
If you’ve followed me on Instagram for a bit, you’ve probably seen me post something about my deep and abiding love of fabric starch—specifically Mary Ellen’s Best Press, which I use by the gallon.
I always, always, always starch my fabric before doing anything with it, and by “starch my fabric,” I mean that I hang my fabric on a tiered drying rack (outside), use a 5-gallon weed sprayer to drench every bit of that fabric with Best Press, and allow it to drip-dry completely. I do this for any fabric that is used in piecing blocks (prints and background fabric), sashings, borders, and sometimes binding, from charm squares all the way up to yardage. (I do not starch backing fabric.) After the fabric has dried, I press it with a hot DRY iron, with a couple of extra spritzes of starch. Only then is it ready to be cut!
I starch my fabrics like this because in my experience, I am able to cut and piece my fabrics more precisely when it is prepped this way, and it also seems to reduce the amount of fraying of my cut edges.
Fabric Cutting Tips
The Swoon 16 pattern features clear cutting instructions, including a helpful cutting diagram. It seems like a lot of cutting when you’re just reading the pattern, but having those clear instructions makes the process a whole lot faster. Here are some things to keep in mind when cutting your fabrics, especially if you’re going to make your Swoon 16 like mine, with the same paired fabrics and solid outer star points:
- You will NOT need to cut the “Group C – Color 3 (aqua) / Outer Star Points” pieces from your print fat quarters. You will be cutting these pieces from the solid red, blue, and taupe fabrics instead!
From the solid red, cut enough pieces for 7 blocks. From the solid blue, cut enough pieces for 5 blocks. And from the solid taupe, cut enough pieces for 4 blocks.
- Save a little sorting time by cutting the fat quarters in their matched pairs. It’s much easier to sort the pieces into sets for each block this way. Here’s an example of a fabric pairing that I cut at the same time and then sorted into the two block sets:
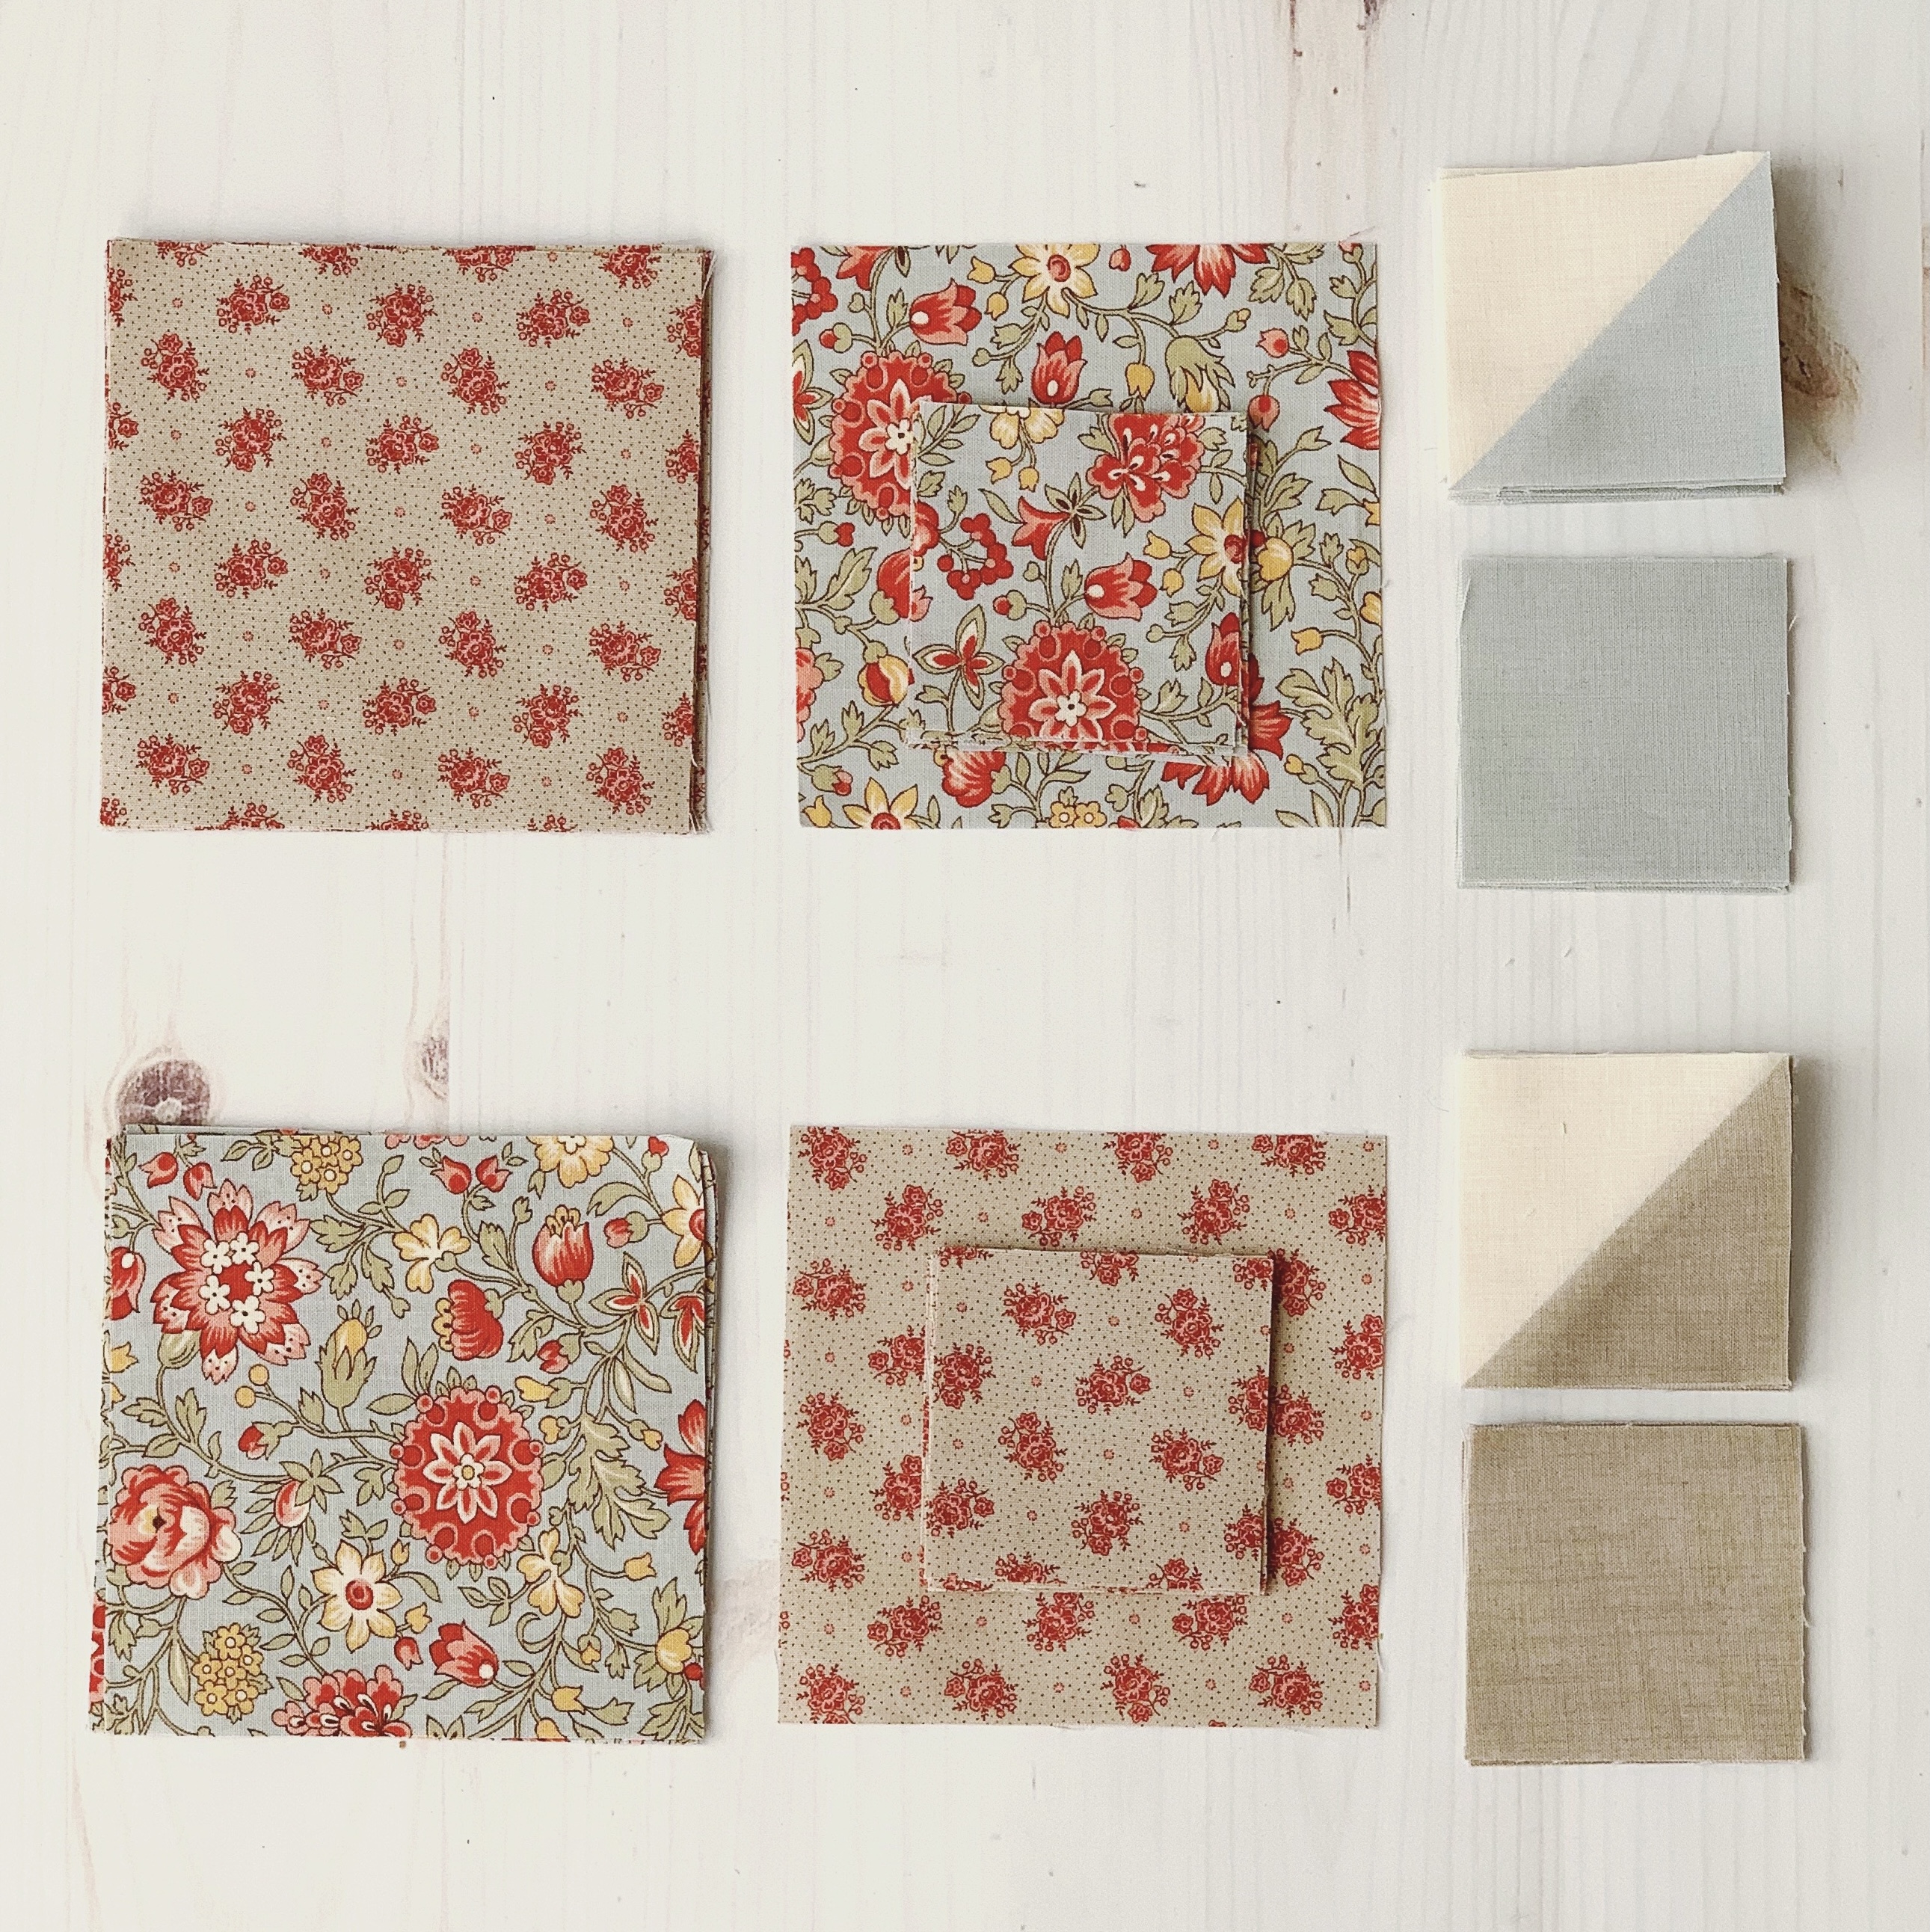
The middle blocks are the “Group B – Color 2 (pink) / Inner Star” pieces.
On the right are the HSTs and squares for the “Group C – Color 3 (aqua) / Outer Star Points.”
- After sorting your cut fabrics into the 16 individual block sets, you might want to group them by outer star point colors, as shown here:
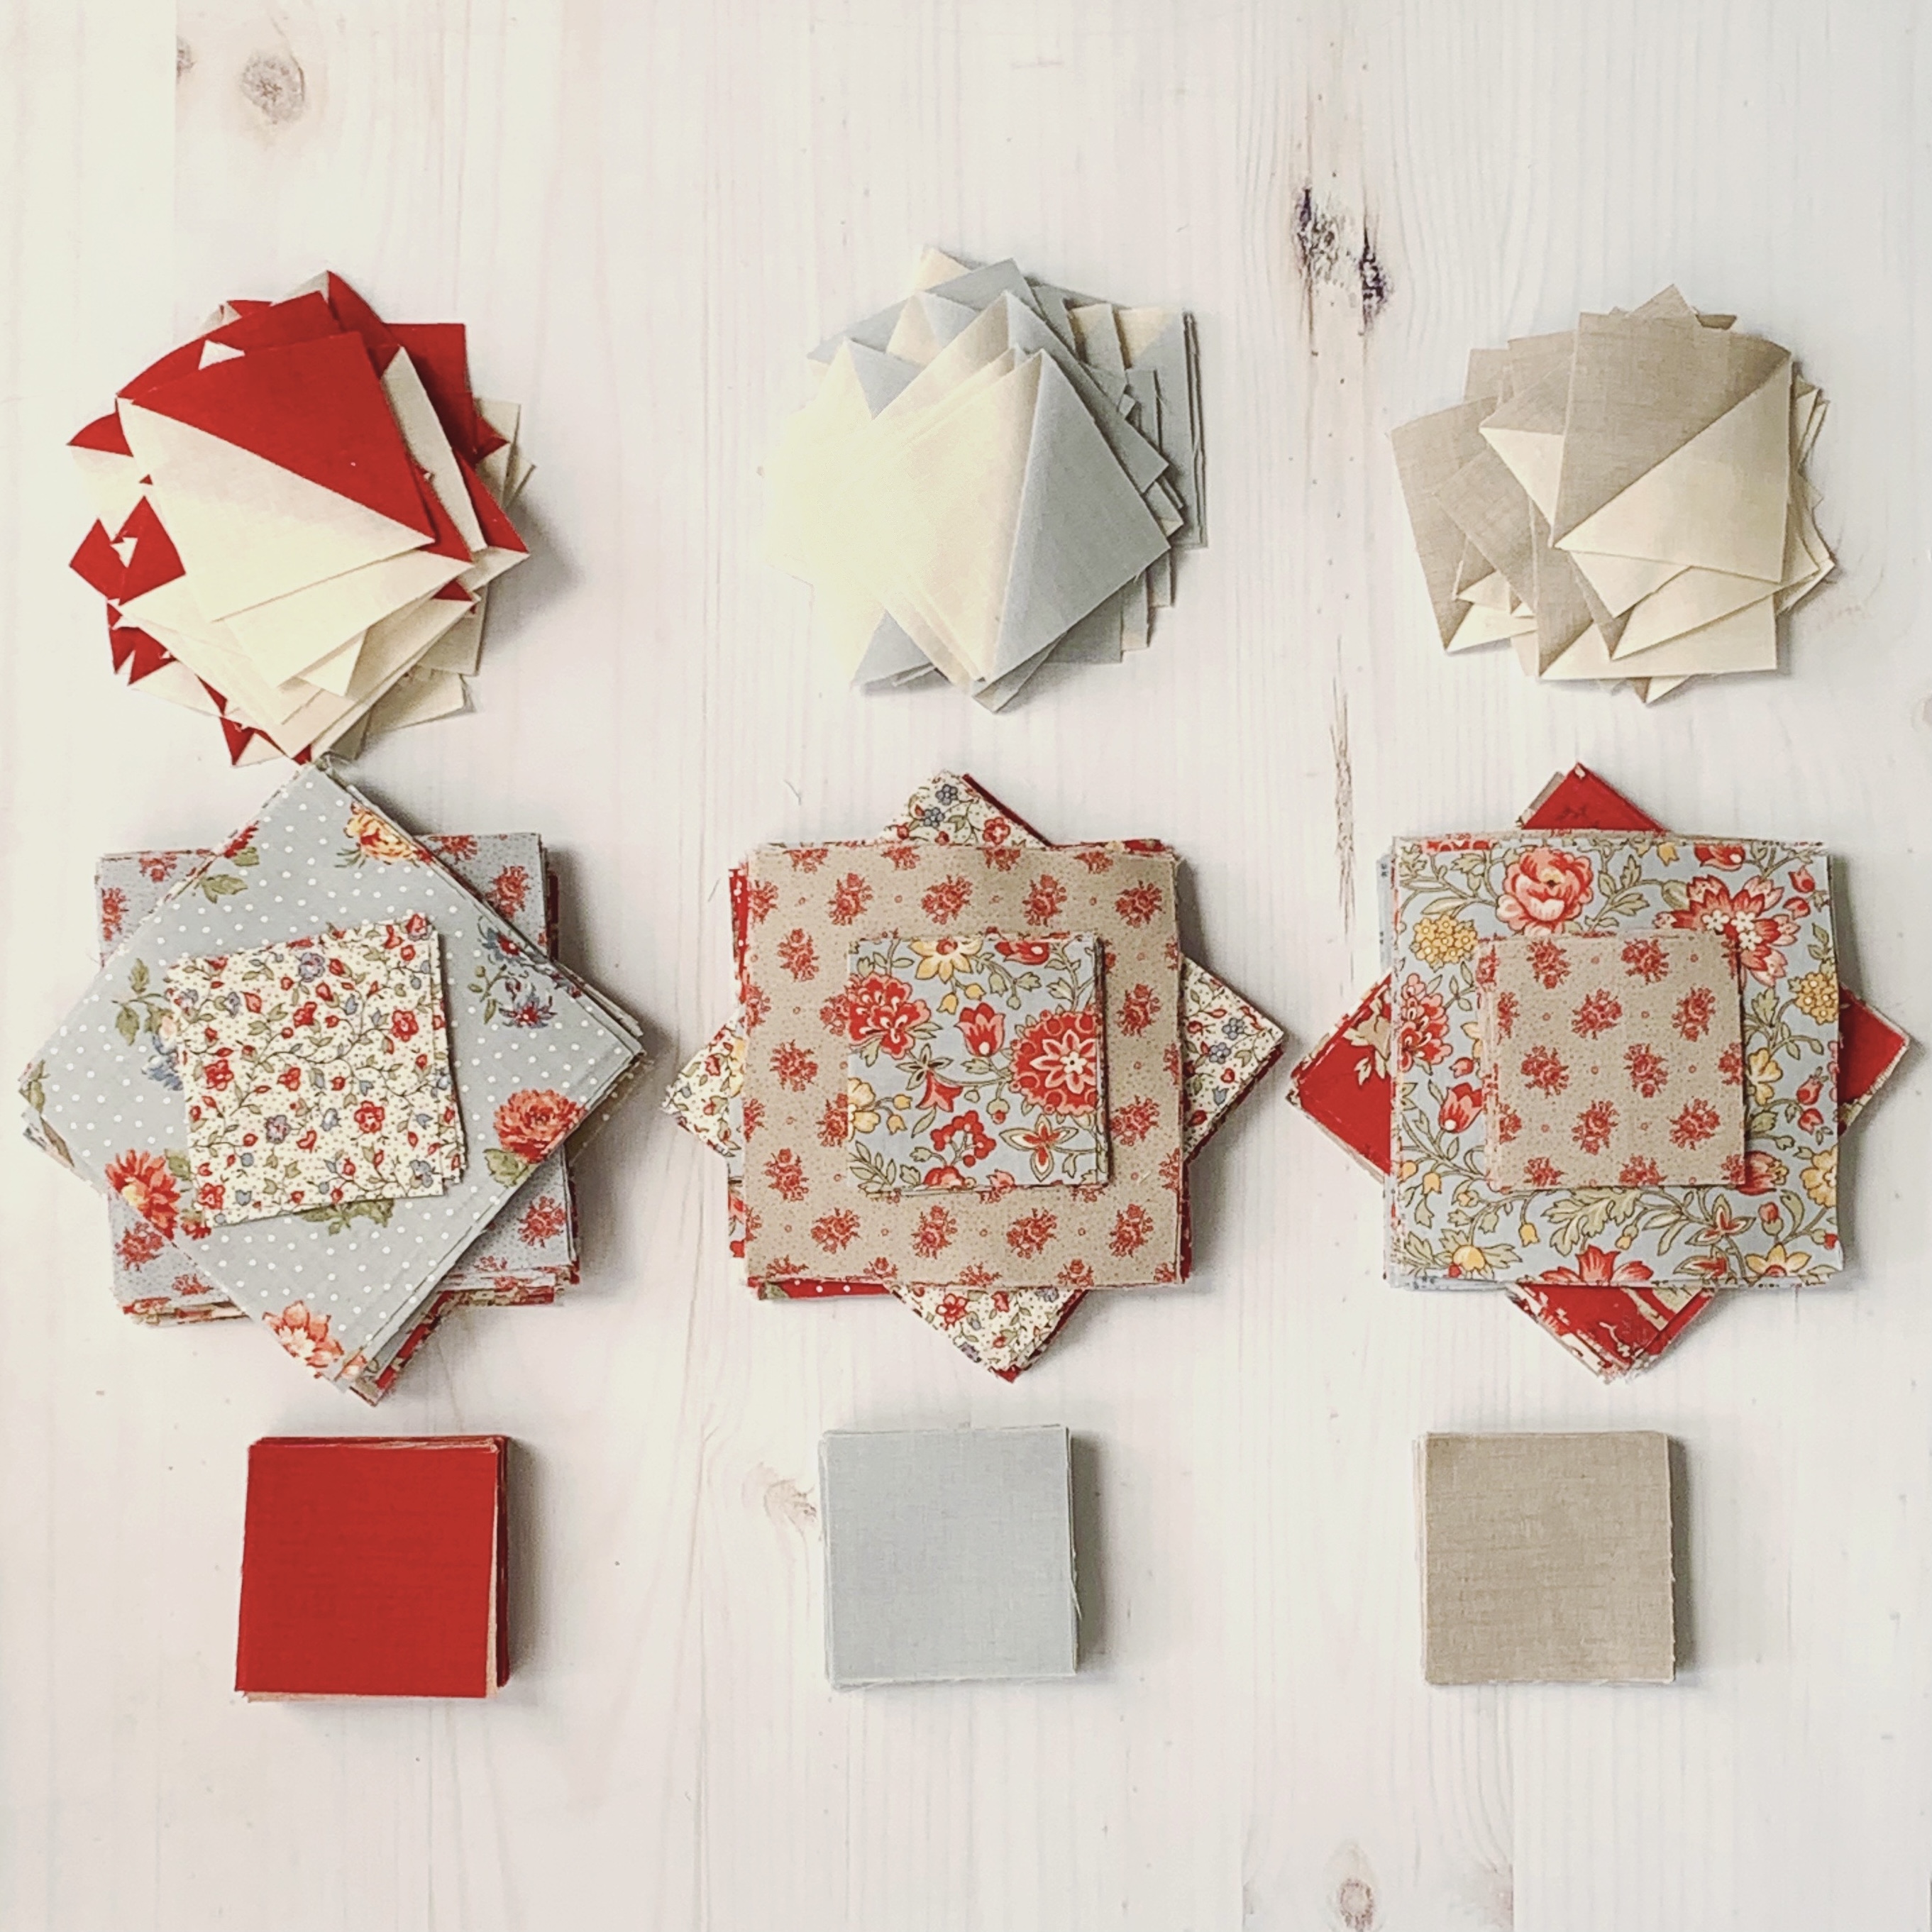
and 4 block sets with taupe Outer Star Point.
I just stack my block sets together (since I have reference pictures on my phone!), but you could use Wonder Clips or Alphabitties to help keep them organized!
- Personally, when I’m working on a pattern that has lots of HSTs or similar small pieced units, getting those pieced and trimmed first is just part of my initial prep work. That’s why you can see my HSTs in these pics! I haven’t started sewing all my blocks yet, but I’ve already made all the little HSTs. Everyone has a different workflow and yours might be to make your HSTs one block at a time—and that’s totally OK! Do what works best for you! But if you have time this week to knock out all the HSTs, you might give that a try.
Whew! That was a lot of information! Sometimes it seems like the prep work takes longer than anything else, but I’ve learned that taking the time to starch, press, cut, and organize all my project fabrics the right way, from the start, saves me time down the road and makes for a more enjoyable quilting experience.
Week 1 Photo Challenge
Are you sewing along with us? Join the fun by posting on Instagram! This week’s photo challenge is to post a pic of your fabric prep process and tell us one of your best tips for choosing, prepping, cutting, or organizing your fabrics before you start sewing! Be sure to use the hashtag #swoonforjardin so we can follow along. I’ll share some of your tips on my IG Stories over the course of the week!
Next week, we’ll start sewing our blocks together!
Quilt-Along Schedule
Week 1 (June 1, 2021): Prep & cut fabrics
Week 2 (June 8, 2021): Sew blocks 1-4
Week 3 (June 15, 2021): Sew blocks 5-8
Week 4 (June 22, 2021): Sew blocks 9-12
Week 5 (June 29, 2021): Sew blocks 13-16
Week 6 (July 6, 2021): Assemble the quilt
Week 7 (July 13, 2021): Show us your finished flimsy!
Looking for previous Jardin de Fleur QAL posts? You can find them here!
Thanks so much for stopping by today! I hope you’re ready to dive into this quiltalong with me and Kaari of French General and our friends at Moda Fabrics!